“All I heard was gravity and surf.”
Oh the boots, the light up boots. I really didn’t know what I was doing for 90% of construction so I am pretty pleased with how it all turned out. I’ll do my best to walk you all through the steps of construction, and really if you want clarification just ask – I know it won’t all make sense.
Boot Detailing
The boot details was done with mostly EVA foam, some wire, pleather and denim left over front the shirt. The base boot I used was a pair of rubber rain boots that I cut down so the shaft was closer to the right height. This allowed the boots to slip on/off without me needing to accommodate for some sort of closure, though the result was pretty loose fitting.
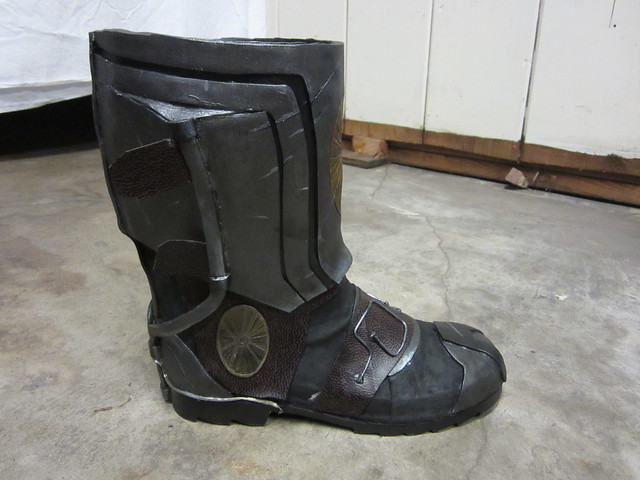
First step was to cover the front of the boot with the denim fabric, this gave it the sort of texture it appears to have in the movie, I stuck it down with lots and lots of super glue (E6000). I wasn’t to careful with the avoiding the sole, I just trimmed everything later.
Next went down a layer of pleather on the front of the shaft and down the side, the basic shape can be seen in the image (don’t use spray adhesive, stick with the super glue). Another strip of pleather goes across the top of the foot.
The main front decoration is mostly one section of EVA craft foam (3mm). This was a double layer to add the inset detailing (red and blue contrast in the foam). The top section wraps all the way around the boot and seams in the back. I didn’t do this at first but I would score the central design and heat it with the heat gun to make it expand and deepen now, rather than after painting as I so foolishly did.
The layers of EVA are glued together with hot glue, then the back section of EVA foam (also a double layer) is glued to the front at the seam (insert the little pleather tabs first), at an angle. Then is is joined to the top wings, keeping a little triangle gap, which is then filled with a strip of EVA foam. Now it is ready for super gluing to the boot shaft. All of the EVA foam should be glued down except where you made the little pyramid sticky out section. The toe cap and heel cap can be glued down, and the EVA section of the top of the foot.
The last bit of EVA detailing is the side wire. I created a wire support in the right shape. Basically it runs over the seam at the side, and the bends to go down the back of the heel. I then sandwiched the wire between two strips of EVA foam, and glued them in place with hot glue. A little bit of final trimming as needed and the boots are ready for lights and painting.
Lights
These were surprisingly simple but I have had several technical difficulties, the wire is very delicate and has snapped in a few places since construction. I used these very small LED Moon Lights in the bright white color. I then determined the pattern that would resemble the actual boots and use all the lights. In essence the construction was carving out a channel for the wire to run through the shoe tread and nesting the lights inside the holes in the tread. I glued them down using clear shoe goo. Lastly I created little pockets on the inside of the boots for the nice and small battery packs to sit. The idea was based on this video tutorial from CF SA.
Painting
Given all the textures spray painting was not really an option. I used a base layer of black acrylic paint and then dry brushed with several shades of silver paint, specifically Micaceous Iron Oxide shade from golden. Wear and tear details were added with brown watered down acrylic and slashes of brighter silver acrylic paint. For the gold medallion I used a blend of gold and brown acrylic paint in several layers. The side medallion was EVA foam painted and then glued on.


