I loved Avatar the last Airbender and I loved Legend of Korra too. They are without a doubt some of the best crafted stories, full of complex, flawed, funny and inspiring characters – and a plethora of badass ladies too! Thus it was only after after a fair quantity of deliberation I finally settled on a Legend of Korra character to cosplay. Though don’t be surprised if you see another Avatar world character down the line.

Photographer: N8Zim
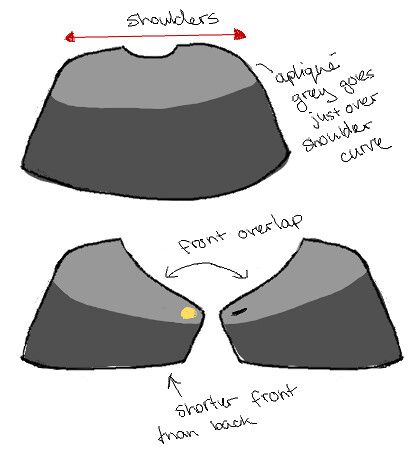
Once I did finally pick Asami Sato, I had the other challenge of narrowing it down to just one of her outfits, it was the tiny caplet in her season 4 outfit that did it for me – who doesn’t want a tiny cape. No one is the answer.
Her costume breaks down into four main pieces: skirt, undershirt/overshirt, cape and accessories.
Skirt
The overall structure is simple, it is a straight line skirt that sits as a mid-rise (between natural waist and hips), there are two darts in the back to stop it from gaping horribly, and a zipper in one of the side seams. The material for the skirt was a wool blend with a small amount of stretch from pacific fabrics, mostly picked because it was the right color, and the lining (so it wouldn’t constantly ride up) was plain ol’ polyester lining fabric. The grey stripe was appliqued over the top and top stitched (after the skirt was assembled), and the buttons were only decorative (¾ in wide). It was hemmed last to just above the knees using a blind hem hand stitching.
Shirt
I constructed the shirt as two separate shirts, though it could easily have been done as one. The undershirt was a lining sleeved v-necked t-shirt, made from a burgundy jersey knit from Joann. It could easily be purchased too if you can find the right color.
The over shirt was a tad more complicated, mostly just the collar which was kind of a pain. The body was a simple straight tunic, wide enough to go over the hips and cutting in just a little at the waist, with two bust darts for shaping. The sleeves were super basic straight tubes and then gathered with elastic just below the elbow.
The collar was less simple because it needs to have a facing which also needed to have a trim, of course. The outside of the collar was a basic trapezoid, then I created a duplicate facing that was just a little bit smaller, which I then added the trim using the undershirt material. I sewed the facing to the collar and added another little bit of facing to accommodate for the opening on the front of the tunic. After some jerry rigging and cursing I had something at mostly worked.
Cape
The cape was pretty basic, using the same fabrics as the skirt. I appliqued the grey contrast to the cape rather than trying to inset the color. This was partly because it would better match the way I made the skirt, and also because I was lazy. The front of the cape over laped just slightly and had a actually functional button and an extra snap to keep it in place.
Accessories
I’ll get to the glove in it’s own post. The rest isn’t too complicated: boots, tights, belt, wig.
The boots I found an appropriate pair at goodwill. The tights were hardest to find, I spent a lot of time trying to get the right color and ended up with a a pair that they of course no longer sell at target (so really good luck, or just dye your own)!
The belt was a strip of the dark grey skirt/cape fabric top stitched down to stay flat, and snapped closed in the back.
I bought the Keiko wig from animestuffstore, and styled it into a low ponytail, with minimal trimming of the hair in the front to get the right sort of dangles. They also have the Aya wig, which is new, or if you have the budget and better skill with lace fronts than I, check this wig out from wigglamour.


