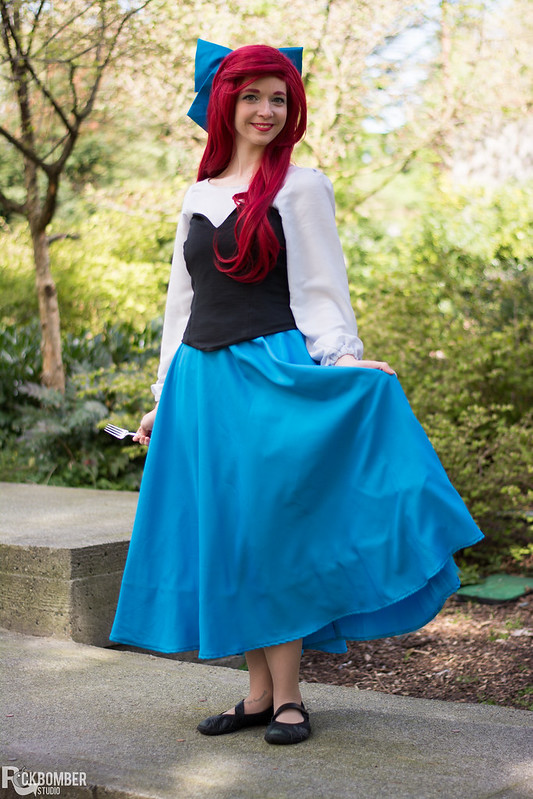
I finally made my princess Ariel cosplay, and in case you feel like reenacting the Kiss the Girl scene (maybe not the falling in the water part), here is a how to/ break down of what I did. Overall the costume is pretty simple and has 5 parts, which is so much less than many I have made!
Skirt
I made the skirt as a 3/4 cirlce skirt with an elastic waist band, about as easy as skirts come. The fabric was the Casa Collection Crepe fabric in Blue Jewel from Joann. This calculator is very helpful for figuring out how much fabric you will need, how many pieces you’ll need to cut the skirt out as and also the radius of the waist and skirt. Due to having an elastic waist I used my hip measurement as the waist measurement to be sure I could pull it on, I also had to cut 1/2 out of one piece and then the last 1/4 out of another, so their are two seams in the skirt.
I added an underskirt, partly so it was less see-through and to add a slight petticoat. I sewed the over and under skirt together at the waist band. On the hem of the underskirt I added about a 4in tulle ruffle, helping give the skirt just a little bit of poof.
Corset
Fabric wise, I chose to go with black rather than navy. In part because there were somewhat conflicting reference images, and also because I couldn’t find the right shade of navy to go with the skirt. I used a matte knit jersey for the outer fabric, the stretch wasn’t important, I happened to have it already and I wanted it to be a matte fabric, the lining was black polyester lining.
The corset wasn’t all too complicated to construct, I used the classic princess seam bodice pattern from Simplicity (yes the one I always use). To make it sleeveless I drew a straight line from the base of the arm hole across the front and back, then I extended the bottom hem and inch or so all the way around, and added another inch and a half in the front to make it come to a slight v. The top notch was then cut out after trying everything all on.
I sewed plastic boning at each seam directly onto the lining – the kind that you can sew through and top stitch to the fabric. I then sewed the lining to the outer layer (right sides together), flipped them inside out and top-stitched them closed at the center back seam. I added gold eyelets (there was much debate about silver or gold) and laced them closed using thin parachute cord.
Undershirt
I used a charmeuse fabric from Joann in a greyish blueish color (I am fairly certain it was this fabric).
I made the construction pretty simple as most the shirt was hidden under the corset. The torso section was essentially a square, I made it long enough ot reach the top of my hips and wide enough to go over my chest, and cut out arm holes and the neck hole so they were the right size (lots of eyeballing it). The sleeve were a basic sleeve pattern, with straight arms and elastic cuffs to give it that blousy look.
Bow
The bow was based on the big bow pattern I used for my sailor scout cosplay. This tutorial gives great step by step instructions, you can adjust the pattern as you want to get the right shape, I would make the tails longer and thinner than the ones on the tutorial, and you can even sew them together so they make a right angle. I attached the bow to the wig using a plastic hair comb sewn to the back of the bow.
Wig
I bought my wig from L-Email Wigs (I have had great experiences with them). These tutorials (one and two) were very helpful for styling the bangs. Also hair spray, all the hair spray.
Now SING!


